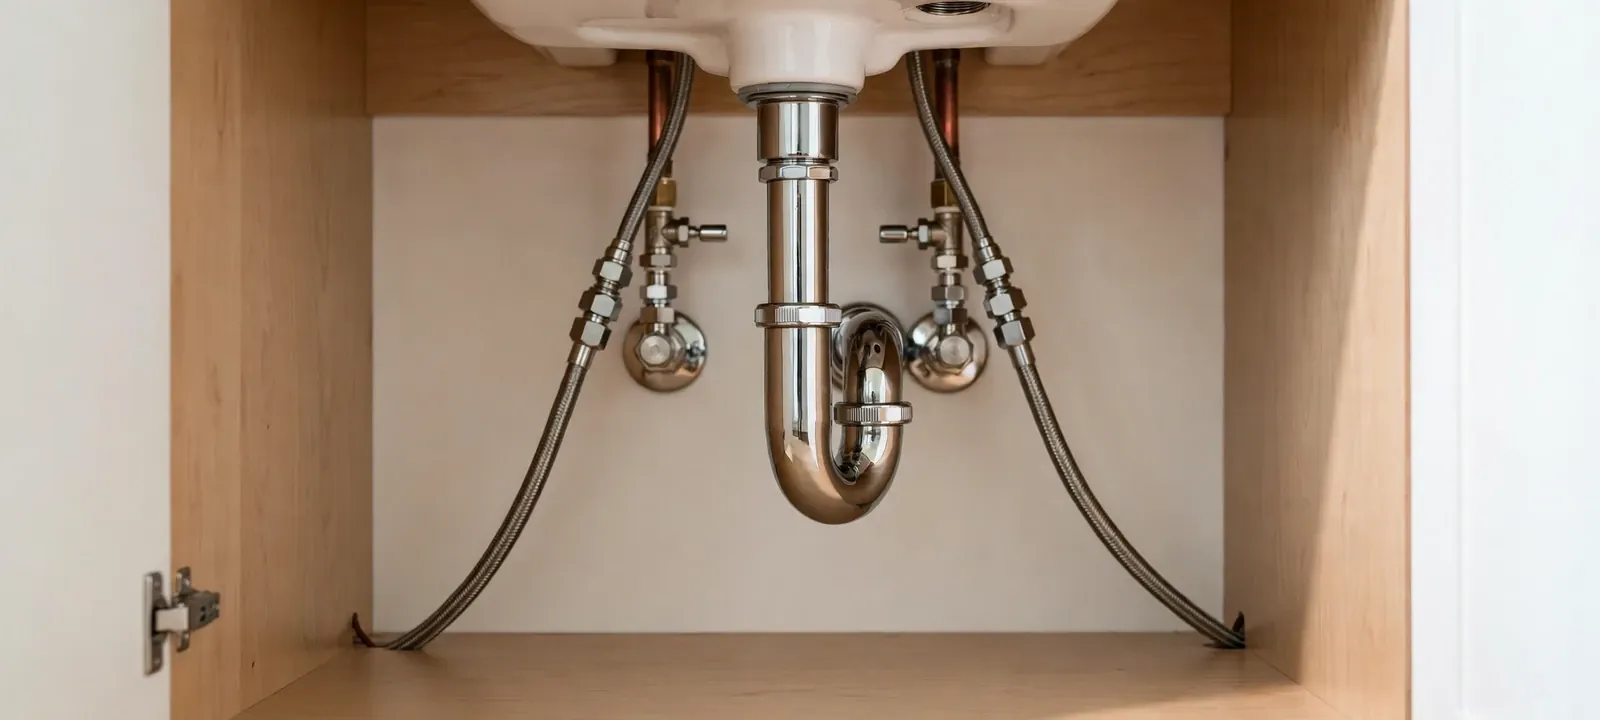
The parts of a bathroom sink
Know the names before you shop.
Faucet and supply lines
Flexible braided lines connect the faucet to the shutoff valves under the sink.
Shutoff valves
Quarter-turn stops let you isolate the sink without closing the main.
Tailpiece and pop-up
The pipe that drops from the sink drain and holds the stopper.
P-trap
The curve that holds water and blocks sewer gas from entering the room.
Trap arm and vent
The pipe into the wall, and the vent that lets the drain move air.
Order of work for a straight swap
Replacing an old vanity top and faucet follows these steps.
Close the stops
Turn both shutoff valves clockwise, then open the faucet to drain the lines.
Disconnect
Remove the supply lines and the slip nuts on the trap. Catch the water in a bucket.
Set the new sink
Seal the drain, mount the faucet before you set the sink, and make sure the sink sits level.
Reconnect and test
Hand-tighten the slip nuts, then a quarter turn. Run water and check every joint with dry tissue.
Slope, vent and the common mistakes
The trap arm needs a slight downward slope toward the wall, and the vent connection must be in the right place. A drain that is too flat or too steep drains slowly or siphons the trap dry. A dry trap lets sewer gas back into the room.
Common mistakes include overtightening plastic nuts, forgetting washers, using a corrugated trap that catches hair and placing the trap too far from the vent. If the old setup drained fine, copy it. If you are changing the layout, the rules in the plumbing code control the distances.
Local note: code, permits and who can do the work
Minnesota's plumbing code is Minnesota Rules chapter 4714, which is based on the 2018 Uniform Plumbing Code with state amendments. Minnesota Statutes section 326B.46 lets homeowners do their own plumbing in their own residence unless a local ordinance forbids it.
The City of South St. Paul's Building Permits and Inspections office issues plumbing permits, so ask before you move or add fixtures. Source type: state rule and statute, and the city's permit page. If you hire out the work, check the plumber on the Department of Labor and Industry license lookup.
DIY or call a plumber
This is how we split the jobs.
| Job | DIY fit | Why |
|---|---|---|
| Replace faucet in the same sink | Good fit | Supply lines and a few nuts |
| Replace vanity and top | Good fit with care | Disconnect and reconnect only |
| Replace the trap | Good fit | Slip nuts and a bucket |
| Move the sink along the wall | Plumber | New supply and drain run |
| Add a sink in a new bathroom | Plumber | New vent, drain and permit |
Start small. A leak at a slip nut is easy to fix. A leak in a wall is not.
When to bring in help
If the shutoff valves do not close, or if they weep when you turn them, stop and replace them. Old valves often seize or leak when moved. A plumber replaces them quickly. Corroded galvanized lines in older homes are another sign to call.
For a basement bathroom, the drain may sit below the main line and need a pump. That belongs to a plumber. See plumbing installation for new bathroom plumbing, and our Inver Grove Heights page and Cottage Grove page for coverage outside South St. Paul.
Tools and parts checklist
Buy these before you start, and a second trip to the store becomes unnecessary.
- Two braided supply lines the right length for your faucet
- A new P-trap kit in the diameter that matches your drain
- Plumber's putty or silicone for the drain flange
- Adjustable pliers, a basin wrench and a bucket
- Thread seal tape for any threaded shutoff connections
Testing for leaks the right way
Dry every joint before you turn the water on. Run water into the basin, then pull the stopper and let it drain while you watch the trap. Wrap a dry paper towel around each fitting and check it after ten minutes. A damp towel shows a leak you cannot see.
Check again the next morning. Slow drips at slip nuts often show up only after the pipe cools and the fitting settles. Tighten by a small amount and test again before you close the cabinet.
Sources for this page
Code points come from Minnesota Rules chapter 4714 and the 2018 Uniform Plumbing Code (UPC). The owner-work allowance is Minnesota Statutes section 326B.46. Permit authority comes from the City of South St. Paul.
Questions about this topic
Most bathroom sinks use a 1-1/4 inch tailpiece and trap, and many wall drains are 1-1/2 inch. Check the existing size before you buy parts.
The trap arm slope may be wrong, the trap may be too long or the vent may be blocked. Hair in the trap is the usual cause.
Putty works for most metal drains. Silicone is better for some stone and plastic parts. Follow the sink manufacturer's directions.
State law lets owners do plumbing in their own residence unless a local ordinance forbids it. Ask the city about permits.
Every fixture needs a vent through the plumbing code. For a replacement in the same place, the existing vent usually works.